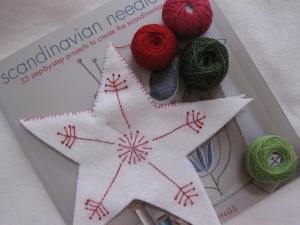
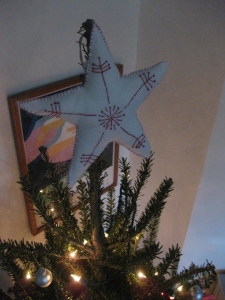
 Until last year, we always traveled to Florida on Christmas Eve. Although we liked to fancy it festive to get up at the crack of dawn to zoom to JFK, jostle with fellow travelers laden with presents, and so on, it is infinitely better to spend Christmas in our own home. We can finally have a non-token Christmas tree–not only are we here to enjoy it but we can actually have a tree taller than a toddler. Resulting in a sudden need for ornaments. I’ve made some over the years and we bought some more, but we needed a tree topper extraordinaire. I made this star out of felt. I improvised the embroidery based on designs in the book Scandinavian Needlecraft. First I cut out two stars, embroidered the design on one side, then blanket stitched the two stars together. I left the side of one point open and used a chopstick to push stuffing into the points. Then I stitched a loop of ribbon into the open space before blanket stitching the star closed. Here it is atop our tall tree!
Category Archives: Holiday
Holiday Card Display
My small apartment just won’t allow a lot of holiday display. There’s no fireplace, no mantle, and not a lot of surface area that isn’t already buried in unopened mail.
So I’m pleased that I found a happy solution to showing off holiday cards (many of which have come from Brigit over the years–like the great fabric tree above). I bought a couple of yards of pretty ribbon, cut two slots inside each card with an X-acto, and threaded the ribbon through. Now the cards are hanging merrily along a doorway–festive but not cluttered. Also it’s my favorite type of project: low-skill, low-cost, and high in satisfaction. Merry Festivus, folks.
Winter Matchbox House!
Get out your fine-point Sharpies! I made a new Winter Matchbox House for the holidays for those of you with both time and matches on your hands.
I couldn’t manage to take a decent photo of the downstairs with my new camera. I’m not blaming my new camera per se, but it’s the only new variable here. I’m just saying. If I manage to take some better photos, I’ll post them.
Lego Miniman!
Oh yeah, we did. We spent a Saturday making Lego miniman heads for our annual neighborhood Halloween party. Those are hours we will never retrieve.
But of course it was worth it. We bought concrete form tubes (also called Sonotubes) at the hardware store: 10″ diameter for larger grown-up noggins, 8″ inch diameter for kid craniums. We sawed the tube into individual helmets, then traced cardboard circles for the tops. We used sponge for the “connectors.” And spray-painted the whole deal bright Lego yellow.
We skipped the rest of the costume because, even though we made an effort, we weren’t going to go overboard on effort. (Here is a link to some folks who went above and beyond in making Lego costumes.) The Lego miniman smirk was the best part of the helmet, I think. The worst parts: no peripheral vision and gradual, but undeniable, aphyxiation. Happy Halloween!
Fabric Easter Eggs

 These fabric eggs–ok, in this case, lumpen footballs–come from a pattern posted by retro mama. Mind you, her eggy creations aren’t in the least lumpen, and she seems to have mastered the ladder stitch (that maddening little stitch!).
(I like these house ornaments on retro mama, too. Could imagine making a more disheveled version myself.)
If you have some fabric scraps, leftover cotton or polyfill, this is a fun, quick project with an upside: no endless egg salad.
Happy chocolate bunnies and matzo ball soup, everyone!


