DIY Crepe Paper Chandelier


I made this for my school library (where I’m a cardigan- & cat glasses-garbed librarian). The room has high ceilings and big windows so I’m always looking for tall, colorful projects. This one is easy and whimsical. The kids tell me that it looks like a jelly fish.

Materials:

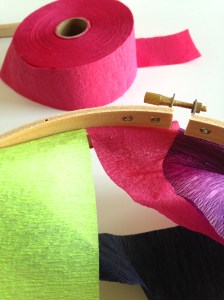
Crepe paper streamers

String, preferably clear nylon (I only had baker’s twine on hand, so I used that!)

2 embroidery hoops–one big and one small

scissors

masking tape

Step 1: Cut lengths of crepe paper in various colors (I left my lengths super long)

Step 2: Open small embroidery hoop. Tape one end of streamer to the inside embroidery hoop.

Crepe Paper Chandelier by homemadecity.com


Step 3: Wrap the streamer around the hoop once.

Crepe Paper Chandelier by homemadecity.com


Step 4: Repeat until you’ve covered the hoop with streamers. Re-attach the outside hoop and tighten. This will secure the streamers in place.

Crepe Paper Chandelier by homemadecity.com

Step 5: Cut 4 equal lengths (about 16-18″) of fishing line/string and tie one, hanging down, to each quadrant of the small embroidery hoop. (These will attach to the large embroidery hoop.)

Step 6: Cut four lengths of fishing line/string and gather together to hang the chandelier. (At this point, there’s a lot of streamer and string and whatnot. Take a moment to hang up the whole shebang before you try to attach the large embroidery hoop.)

Step 7: Now tie the fishing line/string to each quadrant of the large embroidery hoop. I had to play around with the lengths to make sure the second hoop wasn’t too crooked.

Step 8: Finally, drape the crepe paper streamers over the large hoop.


Creative Kid: DIY Easy Printmaking

This is such a fun, easy craft for kids–and it’s doubly rewarding because you get to use something from your recycling box! You know those little foam trays that your grocery store uses to keep your veggies comfortable? Trader Joe’s, in particular, seems enamored with the excess packaging. Anyway, wash that foam and save it because now you’re going to need it.

Zeke and I spent a happy morning making prints. Make sure to cover your work space (I used paper bags–more recyclables!) because kids love to roll the paint around, and things can get messy. Also, if you want to write words in your design, remember to write your letters backwards. We actually used a hand mirror to make sure we were successfully mirror writing.

DIY Easy Printmaking

Materials:

Recycled foam trays

Roller

Washable block printing ink (you can substitute acrylic paint, but the block printing ink is thicker and works better)

Blunt-ended pen or paintbrush

Scissors

Paper


Step 1: Cover your work area. Printmaking gets messy!

Step 2: Trim off the curved edges of your foam trays so you have a flat surface.

easy printmaking by homemadecity

Step 3: Plan your design (remember words need to be written backwards). Draw your design, pressing into the foam with the a blunt end of a pen or paintbrush.

easy printmaking by homemadecity

Step: 4: Pool some paint and run your roller through it a few times so that the roller has an even coat of paint. Now roll paint over your design.

Step 5: Invert your design onto a piece of paper. Roll the back of the foam, evenly pressing your design into the paper.

easy printmaking by homemadecity  easy printmaking by homemadecity

Step 6: Gently lift your design. Voila! The roller and the foam should easily wash off with water.

Zeke print by Zeke

House: DIY namesake pillow

IMG_0527

My daughter has a common/uncommon name and it’s a rare day when her name appears on any souvenirs worth bringing home. A Betty spoon rest is pretty easy to find, but anything an eleven-year-old would actually want not so much. So while she was away at camp (a.k.a. the greatest place on earth) I made her this little pillow for her newly designed bedroom. I followed the cottage magpie tutorial that I use for all my cushions. This pillow is a “small boudoir” (oh la la) size (12×16 “). Here are the steps to make your own namesake pillow.

Materials: About half a yard of main fabric (I used yarn dyed Essex) and a small piece of a printed fabric. About half a yard of unbleached muslin. Embroidery thread. Pillow insert. Fun button.

1. Front panel. Cut one piece of the printed fabric 17 x 5.5″ and one piece of your main fabric 17 x 8.5″. Sew the two pieces together along the long edge using a quarter inch seam. Press the seam toward your main fabric.

2. Use a washable marker to draw your design. I made a straight line one inch above the seam and then scripted betty on the line about two-thirds along the line.

3. Embroider the design using a back stitch.

4. Cut your muslin lining and back panels. Cut the front muslin lining 13 x 17″. Cut two pieces of your main fabric 11 x 13″ and two muslin pieces of the same measure.

5. Place your back panel and lining right sides together and stitch along the 13″ edge using a half inch seam. Turn right side out and press the seam. Pin then tack around the three other sides. Tacking the lining to the fabric makes assembling the cushion much easier.

6. Make a button hole in the center of one back panel half an inch below the seam.

7. Pin then tack the muslin to the main panel (wrong sides together)  one quarter inch from the edge.

8. Next put your pieces together as follows: Front panel right side up; back panel with buttonhole wrong side up; back panel without buttonhole wrong side up, overlapping the other back panel .

9. Align all the edges, pin, and stitch together using a half inch seam.

10. Trim the corners then over stitch around the edge to prevent fraying.

11. Turn the pillow cover right side out and poke out the corners.

12. Sew on your button and put the insert inside the cover.

13. Step back and enjoy your handiwork.

IMG_0524

DIY: How to Make Mini Paper Boxes

homemade city mini paper boxes

These 1″ little boxes won’t solve your storage problems (unless you just don’t where to put that penny, or marble, or piece of lint) but like many miniature things, they are delightful. Once during a bout of unemployment, I folded zillions of these (which may say something about my non-transferable work skills and resulting joblessness). Watch out, they’re fun. Make one, make many: they proliferate under your fingertips.

Materials

3″ square origami paper

bone folder, or a pen with a rounded cap to make creases

IMG_2853

Step 1: Lay one sheet of origami paper, wrong side up, on your working surface. Fold the paper in half, long edge to long edge. (You can gently press with your fingers first, and then use your bone folder to make a sharper crease.) Open the paper and rotate 90 degrees. Fold in half again, long edge to long edge. Again, open the paper.

IMG_2869

Step 2: Fold one corner to its opposite, to make a triangle. Open the paper, and fold the other corner to its opposite. Unfold. Your paper will look like this:

IMG_2873

Step 3: Fold each corner to the center point. (Fold four times.)

IMG_2874

Step 4: Fold the bottom edge of your square up to the center. Fold the top edge of your square down to meet the center. Unfold. Rotate 90 degrees, and repeat, folding the remaining two edges of the square to the center.

IMG_2876

Step 5: Open two of the corners opposite each other. Lift the two sides of the box. Focussing on one corner at at time, press in the “tabs” you created with creases. As you do this, you will be lifting the third side of the box. Then press down the corner over the edge of side. The corner point should meet the other two points. Repeat to make the fourth side of the box. You’ve made the bottom half of the box.

IMG_2878IMG_2880

Step 6: To make the lid, you will do the same thing, but with one alteration. In Step 4, instead of folding the edge of the square to the center, you will instead fold it almost but not quite to the center. Leave about a millimeter of distance from the center. Do this again to the top edge. Open, and repeat with the remaining two square edges. This will make the lip of the lid shorter and increase the diameter of the lid, so that the lid fits over the bottom of the box you created.

IMG_2884IMG_2886

Enjoy!

DIY: Easy color block coasters – free pattern!

IMG_2826

Just in time for ice cold drinks, these nifty linen and cotton coasters are ready to get to work catching drips (and adding some springtime color to your table.) Better yet, a set of these would make a lovely Mother’s Day gift. You can make a set of six in about an hour and your materials will cost $10 at most (or nothing if you are a hoarder of scraps like me).

Materials to make six 4″ x 4″ coasters

IMG_2814

Approximately 1/4 yard linen (I prefer Essex yarn dyed — the color shown above is flax)

Three 5″ squares of solid quilting cotton. (I used three colors of Robert Kaufman Kona cotton: Salmon, Aqua, and Fog.)

Piece of cotton batting (approximately 10″ x 15″)

Cotton thread

Five Easy Steps

1. For the backs, cut six 4.5″ squares from the linen. For the fronts, cut three 5″ squares of linen and three 5″ squares of quilting cotton. Cut six 4.5″ squares of batting.

IMG_2815

2. Cut each of your front squares in half on the diagonal. Pin each linen triangle to a color triangle then stitch a 1/4″ seam along the diagonal. Back stitch at the start and end of each seam. Press the seams open.

3. Trim your finished fronts so they are exactly 4.5 ” squares. (If your squares are perfect, give yourself a pat on the back and just trim away those little points.) Be sure to trim so your diagonal line stays neatly centered.

IMG_2820

4. Make a sandwich as follows: 1) back (right side up, if your fabric has a right side), 2) front (wrong side up), 3) batting. Carefully align the squares and pin. Starting an inch away from one corner, stitch (batting side up) around the edge with a 1/4″ seam. Leave a 2″ gap on one side.

IMG_2821

5. Trim the corners and then turn your coaster right side out. When you are turning inside out, keep the front and the batting together. Poke out the corners to a neat point with a knitting needle or a chopstick. Turn under the raw edges of the gap so they align with the seamed edges and press. Pin the gap closed and then edge stitch around each triangle (back stitch in place at the start and end of each triangle).

IMG_2822

Repeat steps 4 and 5 for each coaster. Now you have a pretty set of coasters to gift or keep!