Quilts and Color Exhibit at Boston MFA


Boston MFA Quilts and Color

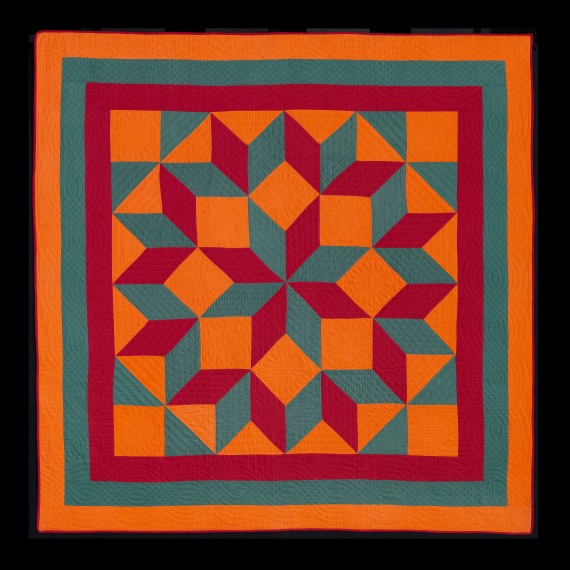
Carpenter’s Wheel Quilt, attributed to Mrs. Miller, Mennonite, Easton, Pennsylvania, about 1890

The quilts displayed at the Quilts and Color: The Pilgrim/Roy Collection now at the Boston MFA are not for those who prefer a palette muted and restrained. While my kids were wolfing Fenway franks at the ballgame this past weekend (Go Sox!), my mom and I snuck off to to take a peek. These are not your grandmother’s quilts–or are they? In room after room, we encountered vibrating, dizzying color in bold patterns that are amazingly modern considering that their mostly Mennonite and Amish makers lived in the 19th and early 20th century.

Sunburst Quilt

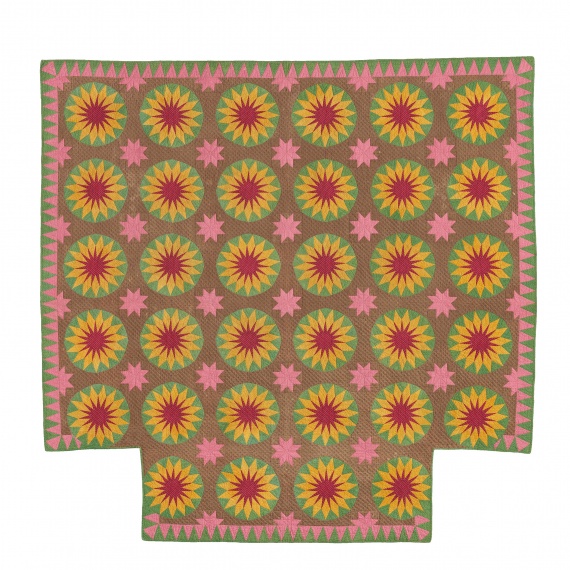
Sunburst Quilt, Mrs. Ephraim Scott, American, 1856

Trained as artists, Gerald Roy and Paul Pilgrim collected quilts reminiscent of modern abstract art. They noted that the quilters displayed an intrinsic color sense, experimenting with saturated hues and color effects. In each room of the exhibit are paintings by Abstract Expressionists and Op Artists, highlighting the affinity between the quilts and the twentieth-century art.

An exquisite painting by color theorist Josef Albers at the Quilts and Color Exhibit

An exquisite painting by color theorist Josef Albers at the Quilts and Color Exhibit


The exhibit runs through July 27, 2014.


DIY: VW Bug Stencil

IMG_2565

I promised I’d share my VW Bug stencil and directions for painting on fabric using freezer paper. Here they are (click below):

VW Bug Stencil and Instructions

Freezer paper stencils are easy and satisfying–the lazy girl’s way to silkscreen. Freezer paper has a shiny side that irons nicely onto fabric and then peels away easily, leaving a crisp, clean image on your fabric. Freezer paper is available at many grocery stores. Leave a comment if you use this VW Bug stencil and please send a pic–I’d love to see your results.

Next, I’ll share the pattern for sewing the VW Bug pillow (complete with groovy pompom trim)!


VW Beetle Pillow Progress!

IMG_2624

It ain’t done yet! This is an anticipatory photo in which I revel in possibilities without actually completing the sewing. Those same possibilities stall me: orange pom poms or green? Orange wouldn’t provide much contrast with the orange-y fabric but it would offer consistency with the VW bus pillow–also orange is available at my local fabric store. Green pom poms require a car drive into the Dreaded Land of Strip Malls. Magenta pom poms are another possibility (available locally, too). Zeke and his friend Rowan agreed that magenta would be OK. But Rowan has green hair, so can we trust him?

See what I mean by stalling?


Felt Tooth Fairy Pillows

IMG_2604

I was under deadline to make these little pillows. My niece and nephew are now six and their milk teeth are bursting out of their mouths like microwaved popcorn. I was working fast and late at night, and although I wasn’t drunk, I was certainly punch drunk. Which proves that felt is very forgiving–as is the Tooth Fairy.

If someone you know is losing their teeth (in the cute way, mind you), whip up this Tooth Fairy Pillow and pair with these terrific picture books: April and Esme, Tooth Fairies by Bob Graham or Throw Your Tooth on the Roof: Tooth Traditions Around the World by Selby Beeler and Brian Karas.

Felt Tooth Fairy Pillow

What you will need:

  • 3 pieces of felt (not the synthetic stuff!) in 3 colors
  • Scrap of ribbon
  • Cotton stuffing
  • Sewing machine (although you could sew by hand, using a blanket stitch)

1. Trim two 6.5 x 4.5″ pieces of felt in contrasting colors. One piece will be the front of the pillow, the other the back.

2. Trim one 3 x 3″ piece from the third color of felt. This will become the pocket.

3. Sew the ribbon to the pocket, making sure to wrap 1/4″ of ribbon over each side to hide the ends of the ribbon.

4. Place the pocket right side out on the front of the pillow. Align the bottom edge of the pocket with the bottom edge of the pillow, centering the pocket across the width of the pillow. Edge stitch the sides and the bottom edge of the pocket to the pillow. (Leave the top open for tiny teeth and cash!)

5. Place the pillow front and the pillow back wrong sides together and machine stitch with 1/4 ” seam around the edge of the pillow leaving about a two-inch gap.

6. Stuff plumply. Machine stich the gap closed.


VW Beetle Pillow — Planning Stages!

IMG_2492

I’m working on a stencil of a VW beetle–to print on fabric and make into a throw pillow for my son’s window seat. A VW bug is trickier than a VW bus–it’s less obvious which parts should be negative/positive space. Right now, I’m leaning toward the image on the right (the parts shaded in purple Sharpie will become the painted areas). What do you think?

Here is the neon green fabric paint and the groovy orange-pink print I’m considering for the pillow. At the fabric store, I told the folks at the checkout counter that I was aiming for the opposite of tasteful. “You’ve done well,” they assured me.

IMG_2515